EDIT: Please use this post for education only. Although the content and themes of this post are valid, the examples included have been superseeded by a GUI based local collector builder from the Velociraptor server.
Background #
Live response collection is one of the most critical stages of modern incident response. A quick targeted collection of important artefacts means timely answers and more efficient results. Although I prefer a remote agent keeping the human element out of collection as much as possible, a common use case I encounter is needing to run a local collection from a USB or network share. Typically this means providing a script of some sort with a binaries folder and collection protocol, sometimes to less technical users with a margin for error.
Mike at Velocidex has posted recently about triage collection (local live response) with Velociraptor:
One undocumented feature is Velociraptor’s ability to append additional tools to the end of the binary and enable execution. This capability opens up some really nice use cases for ancillary data collection during a local Velociraptor triage. Im going to cover creating a Velicraptor local live binary with WinPMem for memory and Autoruns for autostart extensibility point (ASEP) collection.
What do I need? #
I will be using the current Velociraptor release and building on a linux platform. Im looking at building both a x64 and x86 Windows version, so I want to download the relevant Velociraptor binaries to my staging folder.

|
|---|
| Download Velociraptor binaries |
We will also download both x86 and x64 third party binaries supporting my use cases. In this instance Autoruns and WinPMem, which I then add to the relevant “bitness” payload zip files.

|
|---|
| payload.zip: x64 binaries, payload_x86.zip: x86 binaries |
Velociraptor configuration #
Setting up for local live response requires setting up an autoexecution object and output configuration. In my case, I setup artifact called “MultiCollection” with a zipfile output “collection_HOSTNAME.zip”. As there is no folder path specified, the zip will end up in the “start in folder”.
Once the structure of VQL is understood it is trivial to add in additional use cases. Under the parameters section, I also have included an “uploadTable” parameter to add additional direct file downloads not covered by other components. In this case, im adding pagefile, swapfile and hybernation files if they exist as default. This table is helpful for quick collection and can also be represented in a glob style search.

|
|---|
| Autoexecution VQL object |
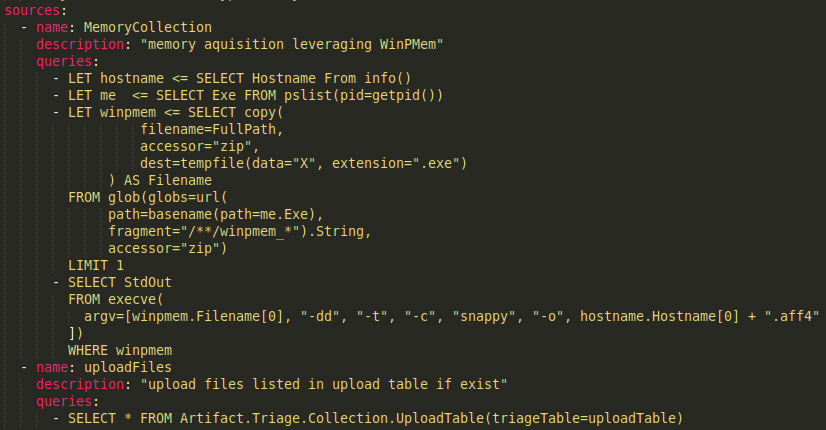
Next component is the “sources” section which outlines the VQL queries to run. In my screenshot below, supporting order of volatility, I am running memory collection first then supporting file uploads. Worthy to note: my VQL does not “upload” to the output zip file, instead I have decided to output to “HOSTNAME.aff4” to the same folder as the binary to optimise resouce use and remove the need to push the aff4 to a temporary location prior to adding to the zip.

|
|---|
| Memory acquisition |
Velociraptor allows modular use of the collection profiles from Eric Zimmerman’s KapeFiles project. I have chosen KapeFiles.Targets _BasicCollection and some supporting items is my next VQL sources. I have also included a version of all currently available switches (at time of writing), to use as a template and remove unwanted items prior to build.

|
|---|
| KapeFiles acquisition |
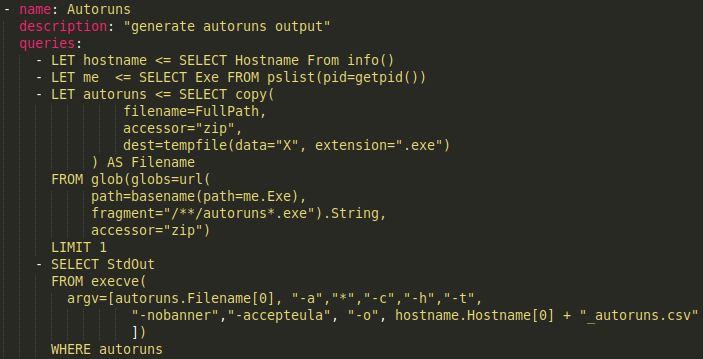
Finally, I am collecting an Autoruns output for autostart extensibility point (ASEP) collection. In my VQL I have specifically used wildcards to cover both x86 and x64 binaries and enable use of the same configuration across bitness. I am also using the same trick as my WinPMem execution and output to the binary root folder as “HOSTNAME_autoruns.csv”

|
|---|
| Autoruns aquisition |
How do I build it? #
To build we run velociraptor in “repack” mode. That is specifying: the input binary, relevant payload zip, configuration file and output binary.

|
|---|
| Velociraptor repack |
One thing to note, is that using this technique the created binary will not contain a valid certificate as the binary is modified with the “repack” command. This condition occurs through any of the Velociraptor customisations and typically is not a problem during live response.
How do I run it? #
Copy the relevant binaries to your collection USB, folder or share and execute with administrator privilege.

|
|---|

|
| Local live response execution |
Output will be to the binary folder.

|
|---|
| Live response output |
Opening collection_HOSTNAME.zip we can see all files that were configured for collection / upload.

|
|---|
| collection zip contents |
Final Thoughts #
In this post I have walked through using Velociraptor to wrap third party binaries into an easy to use local live response tool. Velociraptor’s modular architecture enables rolling in and out capabilities fast for a simple end user experience.
For those that are interested I have included below:
- A build script for building x86 and x64 versions of my local live response tool
- A configuration file with ALL KapeFiles switches
- The reduced configuration from my example
I hope you have gained some knowledge on Velociraptor for local live response. Please feel free to reach out and provide feedback or improvements.